Tuesday, August 12, 2014
Blackmagic Pocket Cinema Camera
A true Super 16 digital film camera
Introducing the pocket sized Super 16 digital film camera that's small enough to keep with you at all times, so you'll never miss a shot! Get true digital film images with feature film style 13 stops of dynamic range, Super 16 sensor size, high quality lossless CinemaDNG RAW and Apple ProRes recording and the flexibility of an active Micro Four Thirds lens mount, all packed into an incredibly tiny size! The Blackmagic Pocket Cinema Camera records 1080HD resolution ProRes 422 (HQ) files direct to fast SD cards, so you can immediately edit or color correct your media on your laptop. Blackmagic Pocket Cinema Camera is everything you need to bring cinematic film look shooting to the most difficult and remote locations, perfect for documentaries, independent films, photo journalism, music festivals, ENG, protest marches and even war zones.Blackmagic Pocket Cinema Camera lets you use the most incredible range of lenses. With the Super 16 size sensor you can use a wide range of adapters for film quality Super 16 lenses, or use commonly available low cost Micro Four Thirds lenses and more. With full electronic control of your lens, you can simply point and set iris all on command! The Micro Four Thirds lens mount also gives you the flexibility to adapt to PL or other lens mounts as required.
Monday, August 11, 2014
Blackmagic Design today announced Blackmagic URSA, a new high end digital film camera designed to revolutionize workflow on set. Built to handle the ergonomics of large film crews as well as single person use, URSA has multiple accessories built in, including a massive 10 inch fold out on set monitor, large user upgradable Super 35 global shutter 4K image sensor and internal dual RAW and Apple ProRes recorders.
Blackmagic URSA is designed to be used on high end feature films, commercials, episodic television production, documentaries, electronic news gathering, music videos and more. When used on jobs with a large crew, customers can easily dress the camera with high quality cinema lenses, rails, follow focus, matte boxes and more. With built in scopes for exposure, focus and audio levels, built in dual recorders and the large 10 inch fold out on set monitor, customers can dramatically reduce on set equipment because it’s all built into the camera.
The Blackmagic URSA features a larger professional size that has the space for powerful cooling that allows higher frame rates while keeping the chassis cool and the fan quiet. The sleek futuristic machined aluminum design is incredibly strong and has been designed for large film crews while being able to be field upgraded to new sensors by the user. Each area of the camera has been divided into separate DOP, camera assistant and audio engineer work stations. The DOP station features a large 10 inch fold out on set monitor and separate 5 inch screen for settings, camera status and scopes. The camera assist station features a separate screen for camera settings, status and scopes and an audio station features audio meters, controls and audio connections.
- Large high resolution 4K Super 35 mm sized sensor with superior handing of image detail.
- Professional global shutter for smooth pans and image motion.
- Wide 12 stops of dynamic range allows capture of increased details for feature film look.
- Compatible with extremely high quality PL or EF mount lenses.
- User upgradable design allows customers to upgrade and change the sensor and lens mount.
- Built in dual CFast 2.0 card recorders allow unlimited duration recording in high quality.
- Open file formats compatible with popular NLE software, such as Apple ProRes and compressed CinemaDNG 12 bit RAW. No custom file formats.
- Support for ProRes HQ, ProRes 422, ProRes LT, ProRes Proxy recording at resolutions up to Ultra HD.
- Features all standard connections, including dual XLR mic/line audio inputs with phantom power, 6G-SDI output for monitoring with camera status graphic overlay and separate XLR 4 pin power output for viewfinder power, 6G-SDI monitoring input, headphone jack, LANC remote control and standard 4 pin 12V DC power connection.
- Built in stereo microphones for recording sound.
- 3 separate built in LCD monitors for camera settings and metadata entry. Large 10 inch screen folds out for full resolution HD monitoring with wide viewing angle and high brightness.
- Supports Ultra HD and 1080 HD resolution capture in 23.98, 24, 25, 29.97, 30 up to 60 fps.
- Features liquid cooling system allowing higher frame rates when future sensors support this feature.
- Supports quick release tripod mounts and adding V-Mount and Anton/Bauer mount battery plates.
- Includes full copy of DaVinci Resolve software color grading and editing software.
Tuesday, July 30, 2013
Lytro: The Light Field Frontier
To my astonishment and delight, a truly innovative digital device recently hit the consumer market, and it did so about as quietly as a snowflake landing on cotton. No show-stopping CES announcement. No TV spot during the Super Bowl. Since the twitterati doesn't ignite the blogosphere over a new $400 camera with less resolution and a smaller display than an entry level point-and-shoot, it is understandable how such a device could go underappreciated. Despite the lack of fanfare, a Silicon Valley startup called Lytro released a camera that is likely to revolutionize photography.

The Lytro Light Field Camera's distinctive functionality and aesthetics challenge the prevailing device design paradigm in a way unseen since Apple's first iPod.
It is easy to confuse reiteration with true innovation. Our technoculture has become so focused on specs and gadgetry that we barely distinguish technology that is new from technology that is repackaged. We're accustomed to device reiteration; it happens at regular intervals and in predictable increments. Every six months, Mega Electronics Corp unveils a groundbreaking “innovation” that promises to reshape civilization in a manner unseen since
I suspect the Lytro camera may be a relic from the future, sent back to the present as an inter-generational gesture meant to draw imaging pioneers toward a new frontier. Lytro's Light Field Camera literally refocuses the focal point of digital imaging by capturing, processing and presenting photos that possess a spatial dimension that is completely new to commercial photography. Light Field Photography says farewell to static images and bestows upon us the interactive, Living Image.
Click the Living Image below to focus on what true innovation looks like...
Click to refocus; click+drag to shift perspective; double click to zoom. Please be aware that these files are very large and need time to load. It helps to refresh the page more than once.
Light Field Photography
Light Field Photography is a comprehensive system that captures one field of view from several points of view. It does so using a plenoptic lens system that divides the transmitted field of view into constituent rays of light. Instead of capturing a single focal plane, as with conventional photography, Light Field Photography captures light rays that can theoretically interpret any focal plane within the visual scene. These captured light rays form a new kind of digital image, one that can be focused and tilt-shifted after the image has been captured.Given our common notions about how digital photography works and how digital cameras are used, referring to the Light Field Camera simply as a "digital camera" may lead to undue comparisons and expectations. This device exists alone upon the verge of commercializing a new kind of imaging device—it is neither a point-and-shoot novelty nor an obscure research instrument—it is simply a Lytro.
Like all digital cameras, the Lytro measures the amount of light to strike each pixel of the camera sensor, but it also records the angle from which the light waves reach the sensor as well as the direction by which transmitted light arrives at the camera. The Lytro uses these three dimensions of information to produce an image that is more representative of both the visual scene’s depth and the geometry of objects within the light field. Only light field photographs contain spatial resolution that allows users to refocus the photograph afterimage capture.
Light transmitted by the Lytro's camera lens is refocused by a microlens array (MLA) in front of the digital sensor. This series of microscopic lenses enables the sensor to record the light field from multiple points of view. Combining these variant perspectives into a three-dimensional light map is how a Living Image is conceived. This three-dimensional information preserves the spatial relationship of light waves within the field of view when the camera shutter is pressed. Analyzing the light wave's intensity, angle and direction is the process though which Living Images are born. Not only does a Living Image enable refocusing, it also allows the viewer to shift perspective by clicking-and-dragging the image.
The Camera
 The differences between the Lytro Light Field Camera and other digital cameras start on the surface. The Lytro is a 4.4 x 1.6 x 1.6” rectangular solid made of anodized aluminum; its rear third is wrapped in a silicone rubber grip and a magnetic lens cap conceals the camera’s objective lens. The only indication of the metal block's purpose comes from a micro-USB icon on the rubber grip. Like the micro-USB port cover, the camera’s objective lens, display screen, zoom control, power and shutter buttons are built discreetly into the streamlined housing.
A fellow writer here at B&H saw the Lytro on my desk and proceeded with rapid-fire guessing, “Is that a flashlight? monocular? rangefinder? flask? pepper grinder? HARMONICA CASE? PENCIL CASE!” I pointed to the power button embedded within the camera’s rubber grip; my coworker removed the lens cap and was snapping Living Images within ten seconds.
When I first handled the Lytro camera, it was obvious that this thing was not a toy. The Lytro is surprisingly substantial. It looks and feels more durable than I expected. Most of that mass is probably concentrated within the rechargeable battery and glass optics. Nevertheless, the fit and finish of the aluminum housing and rubber grip are evidence of quality product design.
The Lytro camera’s unconventional silhouette certainly symbolizes something new to photography. I appreciate the camera’s unique aesthetic, it embodies Lytro’s desire to reshape notions about what a digital camera is. Lytro's product design is more iconic and symbolic than ergonomic. The camera looks great sitting on my desk, but it feels a bit awkward to shoot with. Since the Lytro is more useful to me as an imaging tool than as an attractive paperweight, I worked around its unfamiliar shape until I became comfortable with it. Nevertheless, I still use the included wrist strap as a precaution.
The 1.5" backlit LCD touchscreen includes strengths and weaknesses of its own. The screen itself provides adequate resolution for image playback and capture, but the display is difficult to see unless viewed at eye level. This shortcoming is bothersome but nothing a bit of neck contorting cannot fix.
Optically, the Lytro camera maintains a fixed f/2.0 aperture throughout the entire zoom range. The lens system transmits a 35-300mm equivalent focal length range, thanks to its 8x optical zoom. A touch-sensitive slider in the rubber grip controls zoom adjustments, allowing the photographer to make magnification adjustments in 0.1x increments. Complementing the broad zoom range is the Lytro's impressive close-focus distance, capable of focusing right up to the surface of the objective lens.
The Lytro camera is available in 8GB and 16GB versions, each capable of storing several hundred living pictures—350 for the 8GB, 750 for the 16GB. I have about 250 Living Images stored on my Lytro, and its memory icon appears to indicate more than 25% of available storage space. Considering the 16MB size of each Living Image file and how often I’ve been using the camera, I have been very impressed by both the 8GB storage capacity and run time of the camera’s built-in rechargeable battery.
The Interface
The Lytro's camera settings, exposure control and image review are easily accessible using swipe gestures on the glass touchscreen. Almost every in-camera function is just a swipe-and-tap away, and the Everyday shooting mode is as straightforward as pressing the shutter button. Just like any digital camera, simply pressing the shutter button returns the camera to shooting mode. The camera menus are foolproof, and the swipe gestures offer intuitive response. But if you have thick fingers or a heavy touch like I do, you may be in for some navigation blunders at first.
In Everyday mode, shutter, ISO and focus parameters are automatically set just prior to image capture. This default shooting mode is useful for worry-free photography right out of the box, but leaves something to be desired for those seeking more creative control. Fortunately, the Lytro camera is also equipped with a Creative mode that is a mere swipe gesture away. After I switched my Lytro into Creative mode, it was there to stay. Once they get the hang of the Lytro, most users will probably feel more comfortable in Creative mode; it generally yields better living images, thanks to the enhanced control of the primary focus and spot metering functions.
Although the spatial resolution of a Living Image is the same regardless of the mode used to capture it, Creative mode allows the primary point of focus (and metering point) to be set simply by tapping the LCD screen. Selecting a primary point of focus is great for designating a specific element to pop within the Living Image or simply to set the median distance between foreground and background elements. You will still be able to focus on other focus planes within the Living Image, but the element of primary focus will have the highest degree of detail and will be the default focus point during image review.
For even more creative control, the Lytro camera's manual exposure settings enable Shutter Priority, ISO Priority, and a full manual mode that is supplemented by a neutral density (ND) filter. Since the Lytro imaging engine controls ND filter compensation, results tend to be hit or miss. However, the Shutter Priority and Full Manual modes (without ND filter) reliably deliver the exposure I'm looking for. AE Lock further enables exposure control and helps when composing a shot that has a harsh backlight.
Once the desired focus point has been set in the desktop software, a 1080 x 1080 jpeg image of the selected "slice" of the light field can be exported. As of now, Living Imaging can be published three ways: by uploading to your own gallery on the Lytro website, embedding a Living Image window using HTML, or sharing on Facebook.
The Future
Since the first batch of Light Field cameras shipped in late 2011, the Lytro team has continued to improve the desktop software and camera's firmware. The latest Lytro camera firmware (v1.1.2) includes perspective-shift capability and manual exposure control, among other subtle tweaks. The Lytro-user community requested a self-timer—the Lytro support team delivered within weeks. Light Field pioneers raised concern over the camera's dynamic range—the Lytro support team developed an ND filter update. Last week, the desktop software alerted me of another update: a touch-activated magnification indicator that floats just under the zoom slider. Lytro's helpful and responsive support team is a selling point in itself.As soon as Lytro releases an API or software development kit, LOOK OUT! The open source community and Lytro forums will abound with uploadable patches and alternate GUIs that surely will catapult Light Field pioneers deep into the frontier. Camera functions such as a remote shutter release capability or intervalometer may trickle in at first, followed immediately by a surge of metering modes, shooting modes, image manipulation tools and more. On the desktop software front, I look forward to 3D interpolation, animated GIF generator, focus stacking, depth mapping, and more functionality than my shallow focus can resolve.
By the time light field photography has evolved into a venerable creative medium, the torrent of media created by the intrepid pioneers may inspire new ways that we all interact with digital images. I'm thinking of hands-free, real-time dynamic focusing that is driven by eye-tracking software; in time, the Living Motion Picture that is focused entirely in post production.

The Bottom Line
Light Field Technology available at a consumer-level price is a quantum leap for digital photography. As an imaging platform, the Lytro camera has a long way to go and its functions are sure to be refined. However, the ingenuity and potential built into Light Field Technology is undeniable—and revolutionary.I admit being skeptical of the Lytro camera. I was ready to give this "fad-cam" a panning for the ages. But I cannot argue with results. Light Field Photography is not a fad, gimmick, reinvented wheel or any other derogatory term usually associated with the techno-schlockery that angry fanboys devour for sustenance.
Outlining ways that a point-and-shoot or DSLR camera outperforms the Lytro is as misguided as comparing apples to
Initially, I was dissuaded by the underwhelming 1.2MP (1080 x 1080) resolution of exported jpegs and the, at times, wonktastic user experience. Then I shifted focus from the pixel count and interface to the Lytro’s bigger picture. The Lytro will almost certainly be hailed as the device that ushered prospectors into the Light Field frontier. However, a failure to balance their forward-thinking design priorities with the practical needs of everyday photographers may halt Lytro’s Light Field expedition before it reaches the vanguard.
Incremental advances in material science and nano-scale engineering may help to silence some of the loudly voiced criticisms related to the Lytro’s image quality. A multicoated low-dispersion glass MLA would probably improve image quality in addition to low-light performance and spatial resolution. Moreover, the sooner the Lytro is "cracked" for open source development, the faster we all shall proceed into the uncharted lands of the light field frontier.
The Lytro camera has many strengths and innovative features previously unavailable to the consumer market. The combination of a stout metal housing, touchscreen interface, and steadily improving firmware and desktop software make the initial offering from Lytro very promising. Years from now, you may be reading B&H’s InDepth hands-on review of the LytroPRO Light Field Camera, perhaps a rubber-armored magnesium dodecahedron equipped with a large format light field sensor and a beast of an image processor. Until then, have a long and prosperous journey, Light Field Pioneers.
| 16GB | 8GB | |
| Light Field Resolution | 11 Megarays | 11 Megarays |
| Sensor Type | Light Field | Light Field |
| Sensor Size | 6.5 x 4.5mm | 6.5 x 4.5mm |
| Aspect Ratio | 3:2 | 3:2 |
| File Format | Light Field Picture File (.lfp) | Light Field Picture File (.lfp) |
| Storage Type | Internal Flash Drive | Internal Flash Drive |
| Storage Capacity | 16GB | 8GB |
| Photo Capacity | 750 | 350 |
| Aperture | f/2.0 (fixed) | f/2.0 (fixed) |
| Focal Length (35mm equivalent) | 35 - 300mm | 35 - 300mm |
| Optical Zoom | 8x | 8x |
| Digital Zoom | none | none |
| Exposure Modes | Everyday; Creative (Shutter Priority, ISO Priority, Manual) | Everyday; Creative (Shutter Priority, ISO Priority, Manual) |
| Exposure Lock | Yes | Yes |
| ND Filter | Yes | Yes |
| Shutter Speed | 8 - 1/125 sec | 8 - 1/125 sec |
| ISO Sensitivity | 80 - 3200 | 80 - 3200 |
| Display | 1.52" LCD touchscreen | 1.52" LCD touchscreen |
| Computer Connectivity | Micro-USB | Micro-USB |
| System Requirements | Mac OSX 10.6.6 or later; Windows 7 (64-bit), Windows 8 (64-bit) | Mac OSX 10.6.6 or later; Windows 7 (64-bit), Windows 8 (64-bit) |
| Power Supply | Rechargeable Lithium-Ion Battery Pack | Rechargeable Lithium-Ion Battery Pack |
| Dimensions | 4.4 x 1.6 x 1.6" (112 x 41 x 41mm) | 4.4 x 1.6 x 1.6" (112 x 41 x 41mm) |
| Weight | 7.5 oz (214 g) | 7.5 oz (214 g) |
Monday, July 29, 2013
One-point perspective
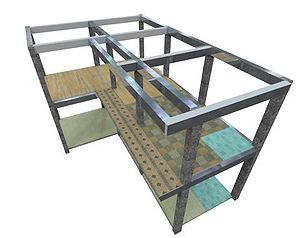
One-point perspective exists when the painting plate (also known as the picture plane) is parallel to two axes of a rectilinear (or Cartesian) scene – a scene which is composed entirely of linear elements that intersect only at right angles. If one axis is parallel with the picture plane, then all elements are either parallel to the painting plate (either horizontally or vertically) or perpendicular to it. All elements that are parallel to the painting plate are drawn as parallel lines. All elements that are perpendicular to the painting plate converge at a single point (a vanishing point) on the horizon.
Two-point perspective
A drawing has two-point perspective when it contains two vanishing points on the horizon line. In an illustration, these vanishing points can be placed arbitrarily along the horizon. Two-point perspective can be used to draw the same objects as one-point perspective, rotated: looking at the corner of a house, or looking at two forked roads shrink into the distance, for example. One point represents one set of parallel lines, the other point represents the other. Looking at a house from the corner, one wall would recede towards one vanishing point, the other wall would recede towards the opposite vanishing point.
Two-point perspective exists when the painting plate is parallel to a Cartesian scene in one axis (usually the z-axis) but not to the other two axes. If the scene being viewed consists solely of a cylinder sitting on a horizontal plane, no difference exists in the image of the cylinder between a one-point and two-point perspective.
Two-point perspective has one set of lines parallel to the picture plane and two sets oblique to it. Parallel lines oblique to the picture plane converge to a vanishing point,which means that this set-up will require two vanishing points.
Three-point perspective
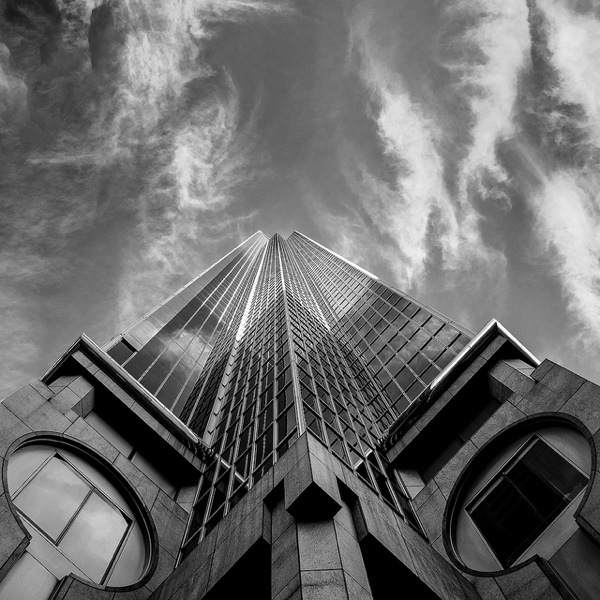
Three-point perspective is usually used for buildings seen from above (or below). In addition to the two vanishing points from before, one for each wall, there is now one for how those walls recede into the ground. This third vanishing point will be below the ground. Looking up at a tall building is another common example of the third vanishing point. This time the third vanishing point is high in space.
Three-point perspective exists when the perspective is a view of a Cartesian scene where the picture plane is not parallel to any of the scene's three axes. Each of the three vanishing points corresponds with one of the three axes of the scene. One-point, two-point, and three-point perspectives appear to embody different forms of calculated perspective. The methods required to generate these perspectives by hand are different. Mathematically, however, all three are identical: The difference is simply in the relative orientation of the rectilinear scene to the viewer.
Four-point perspective
Four-point perspective, also called infinite-point perspective, is the curvilinear variant of two-point perspective. As the result when made into an infinite point version (i.e. when the amount of vanishing points exceeds the minimum amount required), a four point perspective image becomes a panorama that can go to a 360 degree view and beyond – when going beyond the 360 degree view the artist might depict an "impossible" room as the artist might depict something new when it's supposed to show part of what already exists within those 360 degrees. This elongated frame can be used both horizontally and vertically and when used vertically can be described as an image that depicts both a worm's- and bird's-eye view of a scene at the same time.
Like all other foreshortened variants of perspective (respectively one- to six-point perspective), it starts off with a horizon line, followed by four equally spaced vanishing points to delineate four vertical lines.
The vanishing points made to create the curvilinear orthogonals are thus made ad hoc on the four vertical lines placed on the opposite side of the horizon line. The only dimension not foreshortened in this type of perspective is the rectilinear and parallel lines perpendicular to the horizon line – similar to the vertical lines used in two-point perspective.
Zero-point perspective
Because vanishing points exist only when parallel lines are present in the scene, a perspective with no vanishing points ("zero-point" perspective) occurs if the viewer is observing a non-rectilinear scene. The most common example of a nonlinear scene is a natural scene (e.g., a mountain range) which frequently does not contain any parallel lines. A perspective without vanishing points can still create a sense of depth.
Other varieties of linear perspectiveOne-point, two-point, and three-point perspective are dependent on the structure of the scene being viewed. These only exist for strict Cartesian (rectilinear) scenes. By inserting into a Cartesian scene a set of parallel lines that are not parallel to any of the three axes of the scene, a new distinct vanishing point is created. Therefore, it is possible to have an infinite-point perspective if the scene being viewed is not a Cartesian scene but instead consists of infinite pairs of parallel lines, where each pair is not parallel to any other pair. Zero point perspective view is also known as elevation of any object
Friday, July 19, 2013

5 Ways to Strengthen the Message and Story of Your Photographs
Photographers decide what is in the frame and what is not. We cant always control every single item the frame. We can however, control of position relative to the subject and when we press the shutter button. Here are 5 ways to to improve our photographs.
Obvious Subject
Our brains analyze what the eye sees instantly. The subject and story of a photograph must be identified quickly by the viewer. If the viewer cant figure out what the subject is…. all interest is lost.
Brightest
Our depth perception of a photograph creates a 3D effect. The brighter objects appear nearer, darker objects recede further back. If the subject is ‘near’ to the viewer it has to be brighter then the rest of the frame. Dodging in post processing accentuates the subject while burning recedes.
Sharpness

Human brain focuses on sharp items in a photograph next. Photos with shallow depth of field are so pleasing to our eyes – we dont need to search for a subject as its the only sharpest part of the photo.
Size
The largest item in a photo – and our eyes go straight to it as we begin to ‘digest’ the photo. It is possible to have the subject as the smallest item in the picture, what then? Make it the sharpest and brightest!
Color
The 3 primary colors Red, Green and Blue – the colors which are noticed first. When photographing people outside in a park – get as little of the 3 primary colors in the frame. Sounds easy? Well, when in a park green and blue are unavoidable. If those colors are minimized and then desaturated in post the subject will stand out more in the final photograph.
How to Use Leading Lines for Better Compositions
A leading line paves an easy path for the eye to follow through different elements of a photo. Usually they start at the bottom of the frame and guide the eye upwards and inwards, from the foreground of the image to the background, typically leading toward the main subject.
The easiest place to find a leading line is on a road. Roadways are inherently leading because they go somewhere, give us a feeling of motion, and the lines often point so far inwards that they reach a vanishing point – the place where two or more lines converge into theoretical infinity.

The leading lines of the road converge to create a sense of infinity.
When leading lines, such as roads, connect the foreground to the background of a scene, they help to create depth and dimensionality which draws the viewer into the image.
Leading lines are all around us in cities and in nature. Your job as the photographer is to find them and arrange them in your photograph so that they lead towards something, even if that something is infinity.

The logs on the beach draw the viewer’s eye into the frame and lead up to the house.
When you’re setting up a shot, take a moment to examine the scene for its prominent lines. Clear your mind, relax your eyes, and notice where they are naturally drawn to.
Pay special attention to man-made things such as:
|
In nature, pay particular attention to:
|

The soft leading line of the river’s edge creates depth in the image.
Once you’ve identified your strongest lines, consider how you can use them to enhance your composition. Depending on your intention, you might:
- create depth and perspective by positioning a strong line leading from the foreground to the background;
- create a visual journey from one part of your image to another;
- place your subject where the lines converge to give the subject more importance in the frame and draw the viewer’s attention directly to it; or
- make a cyclical composition, with the lines leading the eye in a circular motion and never out of the frame.
Arranging the elements in the frame may involve the use of different lenses to change perspective, but usually you can accomplish it simply by moving yourself so that the point of view you choose is purposeful.

The leading line of the path leads the eye directly to the maple tree.
Leading lines are the key compositional element that carries our eye through the photograph. They can be used to tell a story, to place emphasis, and to draw a connection between two objects.
Subscribe to:
Comments (Atom)


